803-951-1771

803-951-1771

In-Field Modifications ~ Custom Stainless Steel Laboratory Equipment

11.18.2019

After incurring the adverse challenges of incorrect field measurements Stainless Fabricators & Installation, Inc. successfully modified equipment on-site
during installation to save the equipment, therefore saving our customer time and money. What was a potential monetary disaster that would have been
the result of closing operations until new equipment could have been fabricated and a second install trip could have been made to install the new equipment
was completely avoided by the expertise and hard work of the SFI install team.
 
We had a trip scheduled to simply complete four field welds and polish them out in a laboratory. Unfortunately, when we arrived on site we discovered that
the top shown below was too long, the left side column notch was 8″ short, and the right side sink was not centered to the existing plumbing. In addition
the duct work for the down draft unit had been installed prior to the top which also had to be modified on-site.
 
This was an unfortunate situation that does not occur often, however, this is a perfect example of SFI’s team always being prepared. The only way we were
able to achieve this is because when SFI has install or field welding we send experienced fabricators that work in our production shop daily along
with SFI’s enclosed trailer of equipment and tools that are put together to handle most any situation or circumstance that may occur. SFI does not
sub-contract out this type of work which gives us a leading advantage when encountering complicated situations.
 
Take a look through the before and after pictures below to see the amazing save yourself. 


                                    This picture shows the
left side of the top after cutting and extending the column notch and welding and polishing it to a # 4 finish.


This picture shows the right side of the top after 16 inches of the top was cut away and the end splash was reused and welded back on to the end of the top.


            This picture shows the center section of the top after being cut and welded at sink. 


                          This shows part of the top that was cut off the right
end of the center section and was added back to the left side of the center section.


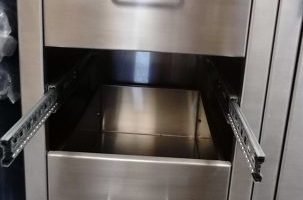
                            This picture is the finished top after being
cut, modified, re-welded, polished to a #4 finish, and installed.


                          This picture shows both sides of the top of the updraft
unit after being cut to fit and tack welded. 


                                      This picture
shows the finished top of the updraft unit after being cut down the center and re-welded to fit around the duct and polished. 


                                      This is a
separate L-shaped top on this job that had two field welds and polishing prior to installation.


  Contact Us today to discuss your stainless steel needs!